Installation Guide
Unboxing
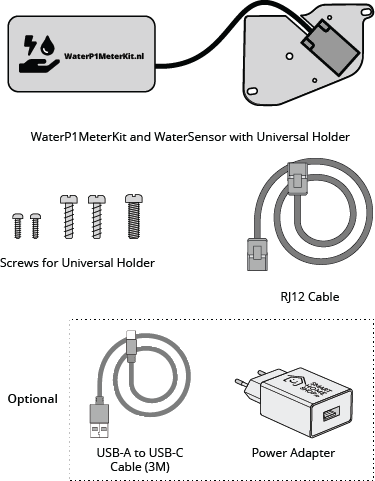
Unbox the WaterP1MeterKit package and identify all the components. You should have the following items:
- WaterP1MeterKit
- RJ12 cable for energy meter
- Screws for Universal Holder
- WaterSensor with Universal Holder
Optional if you selected the option "With USB-C Adapter Set":
- USB-A to USB-C cable (3 meters)
- Power adapter (European)
Step 1: Choose Your Connection
Your WaterP1MeterKit ships with WiFi firmware pre-installed.
| Connection | Action |
|---|---|
| WiFi | Continue to Step 2, you'll configure WiFi in Step 5 |
| Ethernet/PoE | See our Network Configuration guide first |
Most users choose WiFi. Only choose Ethernet if you need a more reliable wired connection or want to use PoE for single-cable power & data (V2/V3/V4 only).
Step 2: Connect to Energy Meter & Install the Sensor Holder
The WaterP1MeterKit allows you to connect both your water meter and energy meter, or just one of the two.
Connect to Energy Meter
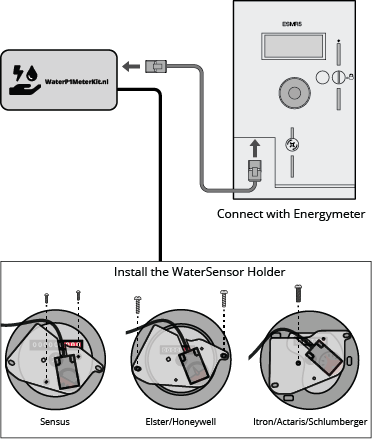
Plug the provided RJ12 cable into the P1 port of your energy meter. WaterP1MeterKit is designed for smart meters with a P1 / RJ12 port, including newer DSMR5 / ESMR5 meters and older DSMR variants that may need custom ESPHome settings after adoption. Sometimes there is also an MBus port on the meter, but this port will not work for the kit itself; only the P1 port is compatible. Plug the other end of the cable into the WaterP1MeterKit.
Important for older meters: DSMR 4, DSMR 5 and ESMR 5 usually work out of the box. Older meters such as DSMR 2.2 need a custom UART/DSMR override in ESPHome if electricity values stay
N/Aorunknown. The kit does not get power from the P1 port, so it always needs USB-C or PoE.
Connect to Water Meter
How the Sensor Works
Our sensor detects the rotating metal plate inside analog water meters. This small metal disc (usually silver-colored) rotates when water flows through. The sensor registers each rotation via magnetic detection = 1 liter of water.
⚠️ No rotating metal part? Unfortunately, our sensor will not work with your water meter.
Compatible Water Meters
Our universal holder fits most European analog water meters. Here are the most common types:
| Brand | Models |
|---|---|
| Sensus | Most models |
| Itron | Most models |
| Elster / Kiwa | Most models |
| Schlumberger | Most models |
| Honeywell | Most models |
| Actaris | Most models |
| Diehl | Most models (special clip-on holder) |
| Zenner | ETDK ZR, ETWD, ZR |
| DH Metering | Most models |
| Hidroconta | Most models |
| Maddalena | Plus C, MVM |
Unsure if your water meter is compatible? Send us a photo via Contact or chat live on Discord.
Installation Videos
Watch these installation videos for popular water meter types:
Type 1: Itron / Actaris / Schlumberger
Aquadis+ tip: On some Itron / Actaris / Schlumberger water meters, the screw thread for the holder can be hidden under a small dust cap. Carefully pry this cap loose with a small flat screwdriver before mounting the holder.
Type 2: Sensus
Type 3: Elster / Honeywell
Standard Holder (most common)
Works with these water meters:
- Sensus
- Elster / Honeywell
- Itron / Actaris / Schlumberger
Installation:
- Attach the holder adapter plate to your water meter with the provided screws
- Do not over-tighten the screws
- Press the sensor firmly into the holder
Diehl Water Meters
If you have a Diehl water meter, you receive a special clip-on holder:
- Simply click the holder onto your Diehl water meter
- Press the sensor firmly into the holder
- No screws required
Other Water Meters (Universal Holder)
If your water meter is not listed above, you receive a universal holder with double-sided tape:
- Clean the surface of your water meter
- Apply the double-sided tape to the holder
- Position the holder correctly:
- The sensor (LED side) has a crosshair marking
- The center point of this crosshair must be positioned so that the rotating metal plate (1-liter indicator) passes through it exactly once per full rotation
- The sensor should cover approximately 50% of the metal indicator's path: not the entire rotation area
- Press the sensor firmly into the holder
Sensor Positioning
For all holder types, the sensor must be positioned correctly:
- Location: Position over the rotating metal 1-liter indicator
- Coverage: The sensor should cover approximately 50% of the metal indicator's rotation path
- Crosshair alignment: The sensor has a crosshair marking on the LED side. The center point of this crosshair must be positioned so the rotating metal plate passes through it exactly once per full rotation
- Orientation:
- The side with the red LED must face DOWN (toward the water meter glass)
- The black side must be visible (facing up toward you)
Tip: Sometimes the lid (the outer plastic part) of your water meter can get in the way. You can often turn this lid by hand to make room for the holder.
Step 3: Power by Cable or PoE
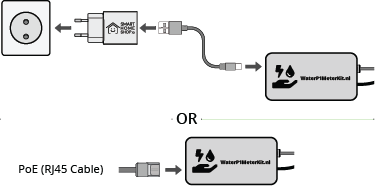
Connect the WaterP1MeterKit to a power source using a USB-C cable and a 5V power adapter (included with the USB-C Adapter Set), or use Power over Ethernet (PoE) for a direct and stable network connection without additional power cables.
| Power Option | Requirements |
|---|---|
| USB-C | 5V ⎓ 1A adapter |
| PoE | Ethernet firmware + 802.3af PoE switch (V2/V3/V4 only) |
When first powered up, the kit will flash a red status light to indicate it is not yet connected to your network or Home Assistant. This issue will be resolved in the following steps.
Using PoE? You need Ethernet firmware installed. See Network Configuration for instructions.
Step 4: Test Sensor Position
The sensor detects the rotating metal plate inside your water meter. Proper positioning is critical for accurate readings.
How the sensor works
Inside your water meter is a small metal plate that rotates once for every liter of water used. The sensor detects this metal plate as it passes by.
Correct sensor positioning
-
Position the sensor to cover ~50% of the rotating metal 1-liter indicator
- The sensor should NOT cover the entire indicator
- It needs to detect the metal plate entering and leaving its detection zone
-
Align the crosshair (center point) of the sensor so the metal plate passes through it exactly once per full rotation
-
Check sensor orientation:
- The side with the red LED must face DOWN (toward the water meter glass)
- The black side must be visible (facing up toward you)
Testing
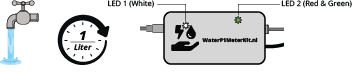
After mounting, turn on a tap. The WaterP1MeterKit should flash a green light for 1 second after each liter of water used. If this does not happen:
- Adjust the sensor position slightly (sometimes just 1mm makes the difference)
- Verify the sensor covers ~50% of the rotating indicator, not more
- Check that the crosshair aligns with the metal plate's path
- Confirm red LED side is facing down
Note: Ignore the red flashing status LED for now. This will be resolved in the following steps when you connect the WaterP1MeterKit to your WiFi network and Home Assistant server.
Step 5: Connect to WiFi
Skip this step if you're using Ethernet. See Network Configuration for Ethernet setup.
Upon starting up the kit, the WaterP1MeterKit creates a WiFi hotspot:
- SSID:
waterp1meterkit(V4 with older firmware:waterp1meterkit-v4) - Password: the same as the SSID
- Connect to this hotspot with your phone or laptop
- The SmartHomeShop setup page should open automatically
- Pick your home WiFi network and enter the password. Turn on SmartHomeShop Cloud only if you want to use the SmartHomeShop app
- Choose Save and connect. The WaterP1MeterKit connects to your network and the hotspot disappears
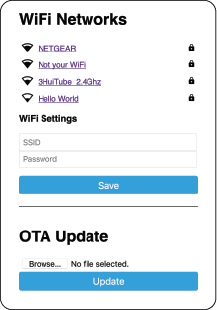
Captive portal not opening? Navigate to http://192.168.4.1/ manually in your browser.
Step 6: Connect to Home Assistant
Once connected to your home WiFi network, Home Assistant will automatically detect the WaterP1MeterKit under the 'Devices & Services' section.
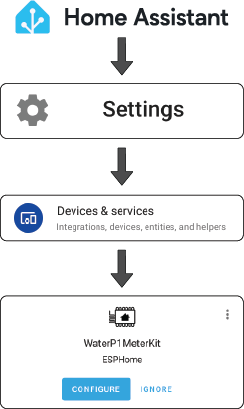
If not automatically discovered:
- Add the ESPHome integration manually
- Enter the device's IP address (check your router's DHCP leases)
Step 7: Configure Energy Dashboard
Now that your WaterP1MeterKit is connected to Home Assistant, you can add your water and energy data to the Energy Dashboard for beautiful visualizations and statistics.
👉 See the Usage Guide for step-by-step instructions on:
- Adding water consumption to the Energy Dashboard
- Adding electricity consumption and production
- Adding gas consumption
- Setting up automation examples
Step 8: Set Initial Water Meter Value
To track your actual water meter reading:
- Read your physical water meter (e.g.,
125.500 m³) - In Home Assistant, find "Water Meter Initial Value"
- Enter your current meter reading
- "Water Meter Total" will now show your actual meter reading
For Energy Dashboard: Use the
Water Total Consumptionentity. It works perfectly even when it resets after a restart or reboot because Home Assistant tracks the history.
Sensor Cable Information
Cable Length
The water sensor cable is 3 meters long. This is the maximum recommended length.
⚠️ Do not extend the sensor cable beyond 3 meters. Longer cables cause voltage drop, resulting in unreliable readings or data loss.
Disconnecting the Sensor
The sensor connection differs by hardware version:
| Version | Connection | How to Disconnect |
|---|---|---|
| V3/V4 | Connector plug | Simply unplug the connector |
| V1/V2 | Screw terminal | Open enclosure, unscrew 3 wires |
For V1/V2 owners:
- Carefully unclip the enclosure housing
- Locate the screw terminal with 3 wires
- Loosen the screws and remove the wires
- Take a photo first to remember the wire color order!
- When reconnecting, match the colors exactly
Need More Distance?
If the 3-meter sensor cable isn't long enough:
💡 Recommended: Install the WaterP1MeterKit as close to the water meter as possible, then use an Ethernet cable (up to 100m) for the network connection. Ethernet is designed for long distances without signal loss.
Next Steps
- Configure Energy Dashboard: See Usage Guide for setting up the Home Assistant Energy Dashboard
- Switch to Ethernet: If you want a wired connection, see Network Configuration
- Troubleshooting: If something isn't working, check the Troubleshooting Guide
Quick Links
- Hardware Versions: Compare V1, V2, V3, and V4
- Network Configuration: WiFi/Ethernet setup & switching
- Usage Guide: Energy Dashboard configuration
- Troubleshooting: Common issues